

Summer is finally here and what better way to enjoy the outdoors with family and friends than some classic yard games.
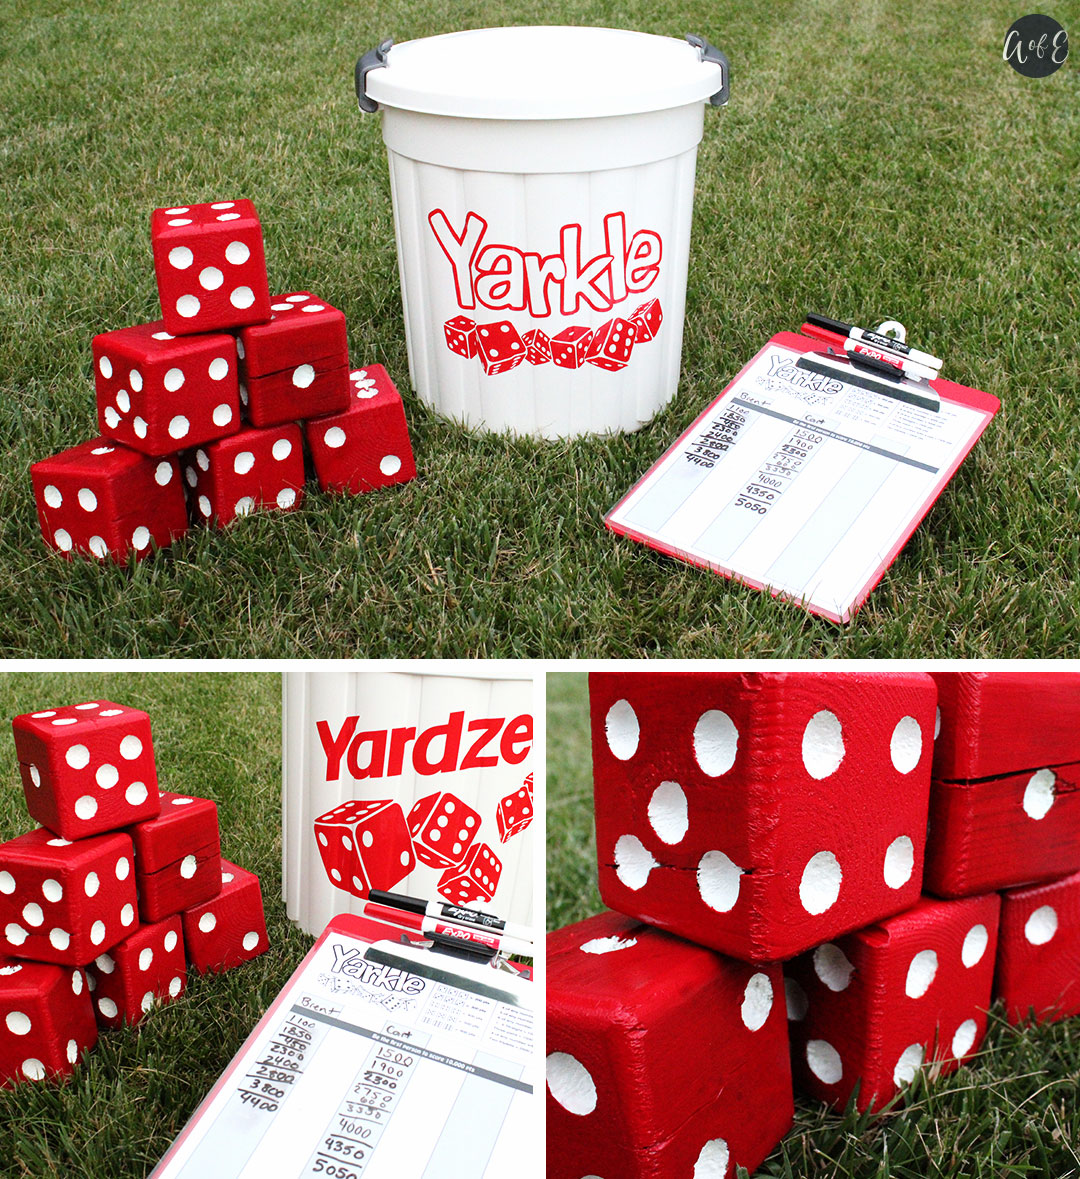
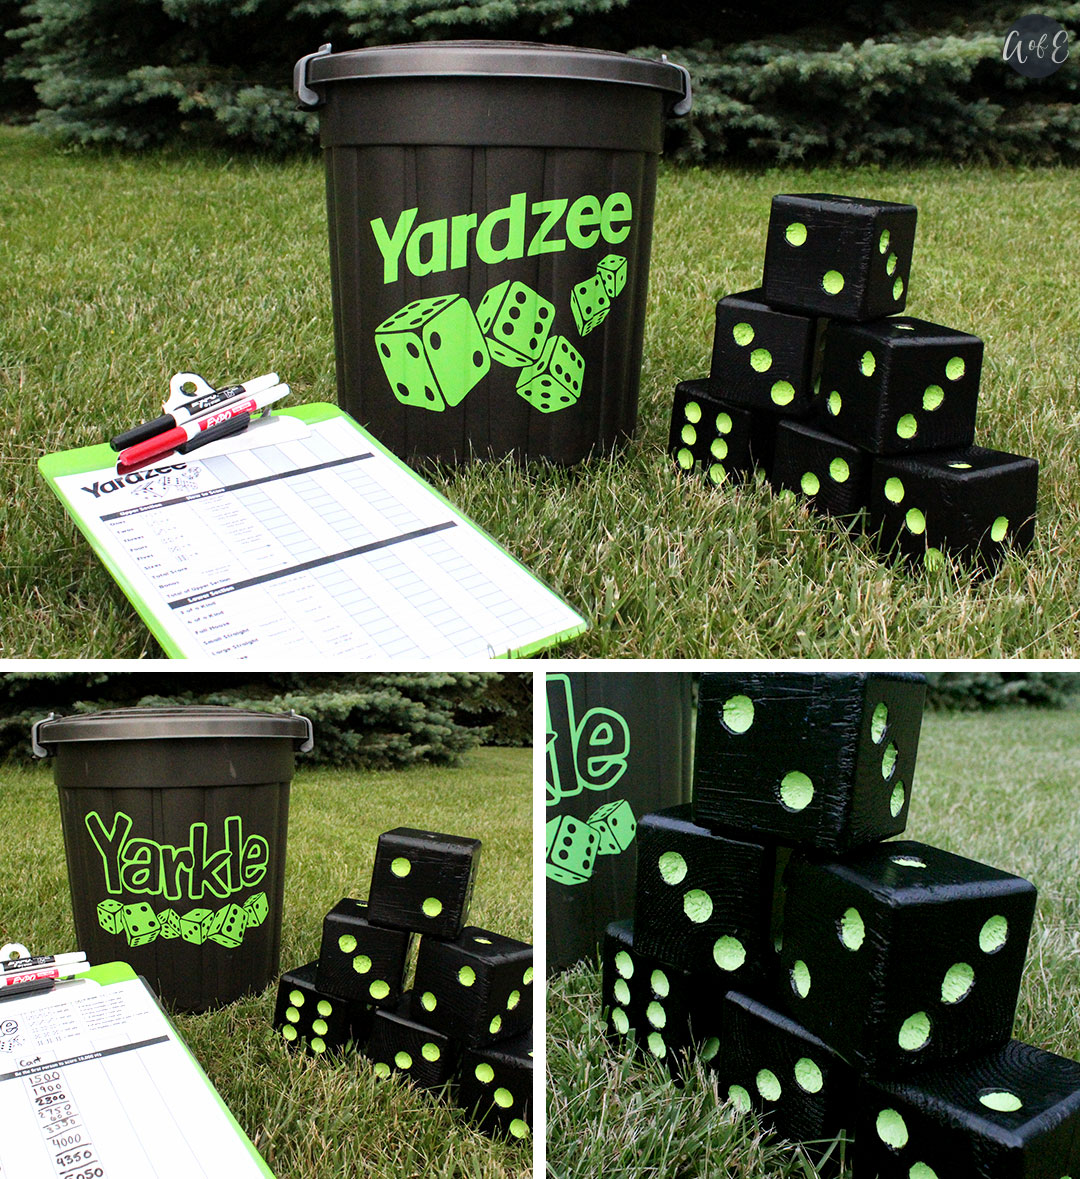
In this do-it-yourself project, you will learn how to create your own dice themed yard games. Let’s take the classic Yahtzee and Farkle dice games and turn them into Yardzee and Yarkle. Two different games in one fun yard game bucket!
Don’t quite remember the rules to Yahtzee or Farkle? No Problem, we all forget things. You can find the Yahtzee rules here, and Farkle rules here.
What You Will Need:
4 x 4 Wooden Posts – If you have scraps, use them! (Home Depot)
¾ Inch Cove Bit – (Lee Valley, or somewhere cheaper)
1 Bucket with a Lid for Storage – (Walmart)
Paint and/or Stain
Mod Podge (Michael’s)
Paint Brushes
Sandpaper and/or an electric sander
Custom/Handmade Score Sheets
Clipboard (Dollarama)
Dry Erase Markers (Dollarama)
Laminator
And if you want to get really fancy like I did…
Vinyl (You would need a vinyl cutting machine for this step, or simply use a water resistant label – Avery sells these)
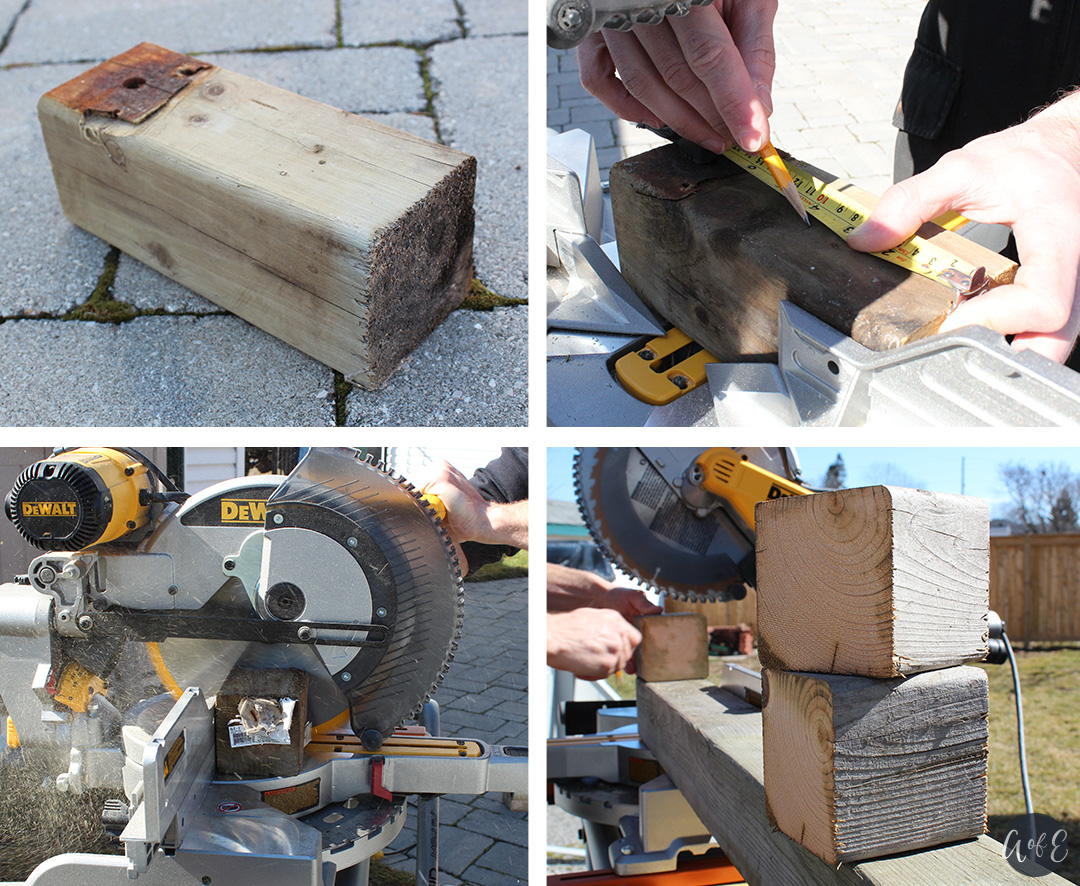
Step 1: Measure and Cut the 4 x 4 into 6 Blocks
Carefully cut your 4×4 into blocks. Not every 4×4 is exactly 4”, so it’s important to measure your height to determine how big your width will need to be in order for them to be somewhat perfect blocks (dice). My 4×4’s height was about 3.75” so that determined my width to be 3.75” as well.
You will need to make 6 dice. Only 5 dice are needed to play Yardzee, but you will need 6 to play Yarkle.
If you have any scrap 4×4’s lying around from another project, now is the time to use them! It doesn’t matter if the wood is dented or cracked because the paint covers everything nicely. Keep in mind, you will be throwing them around so eventually, they will get cracked or scratched.
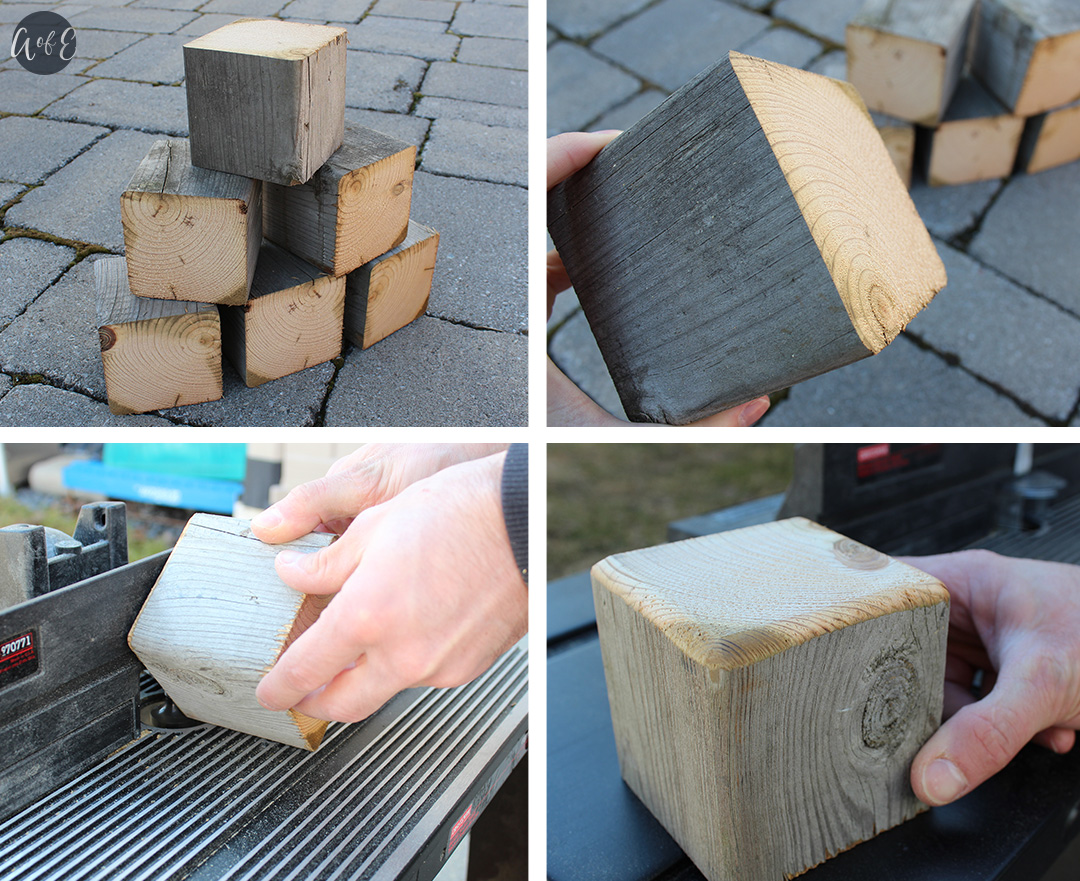
Step 2: Router the Dice Edges
Take each dice and router the sharp edges. You should end up with slightly round, smoother edges. The rounded edge size is totally up to you and your personal preference. I prefer smooth edges so they don’t feel as sharp when I’m throwing the dice around.
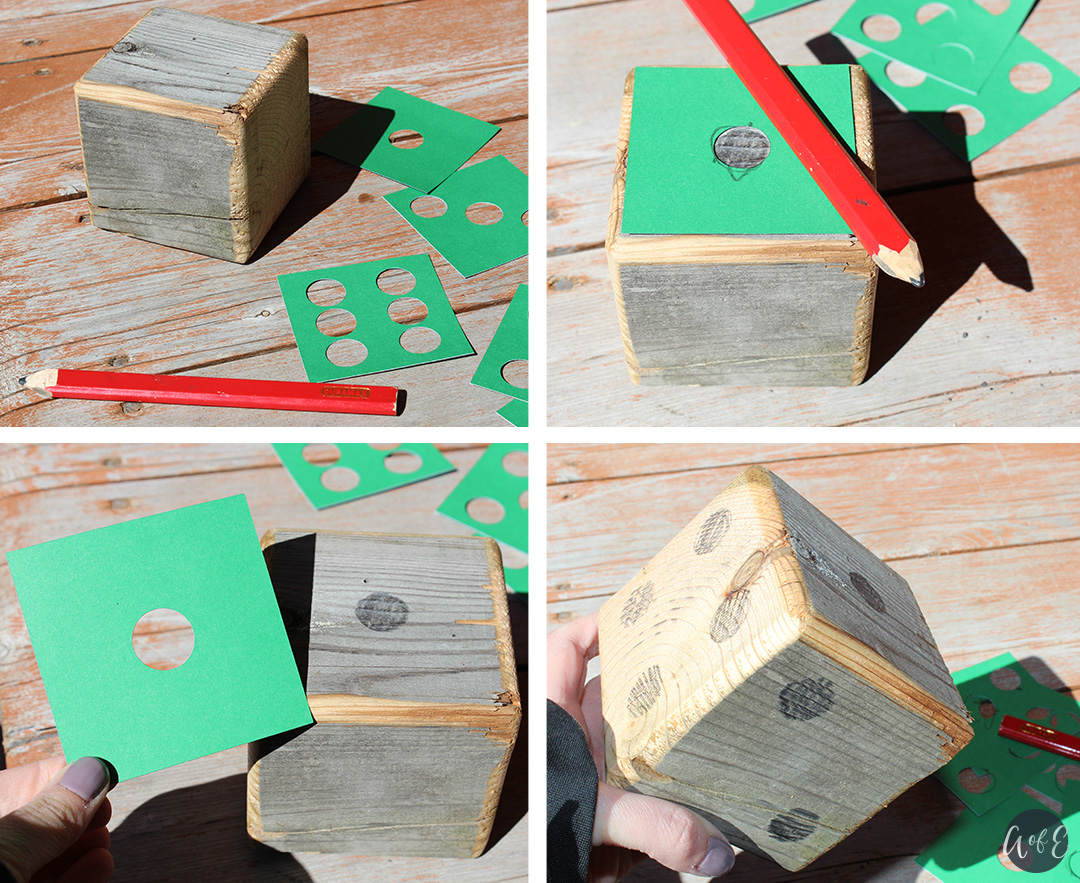
Step 3: Draw the Dice Dots
Freehand draw or create a stencil to draw the dots on your dice. I chose to create a stencil. There is a correct way to position the dots on the dice, I’m just not 100% sure what that is. When drawing the dots on my dice, I made sure each opposite side added up to 7. For example; 3 dots on one side and 4 dots on the opposite side.
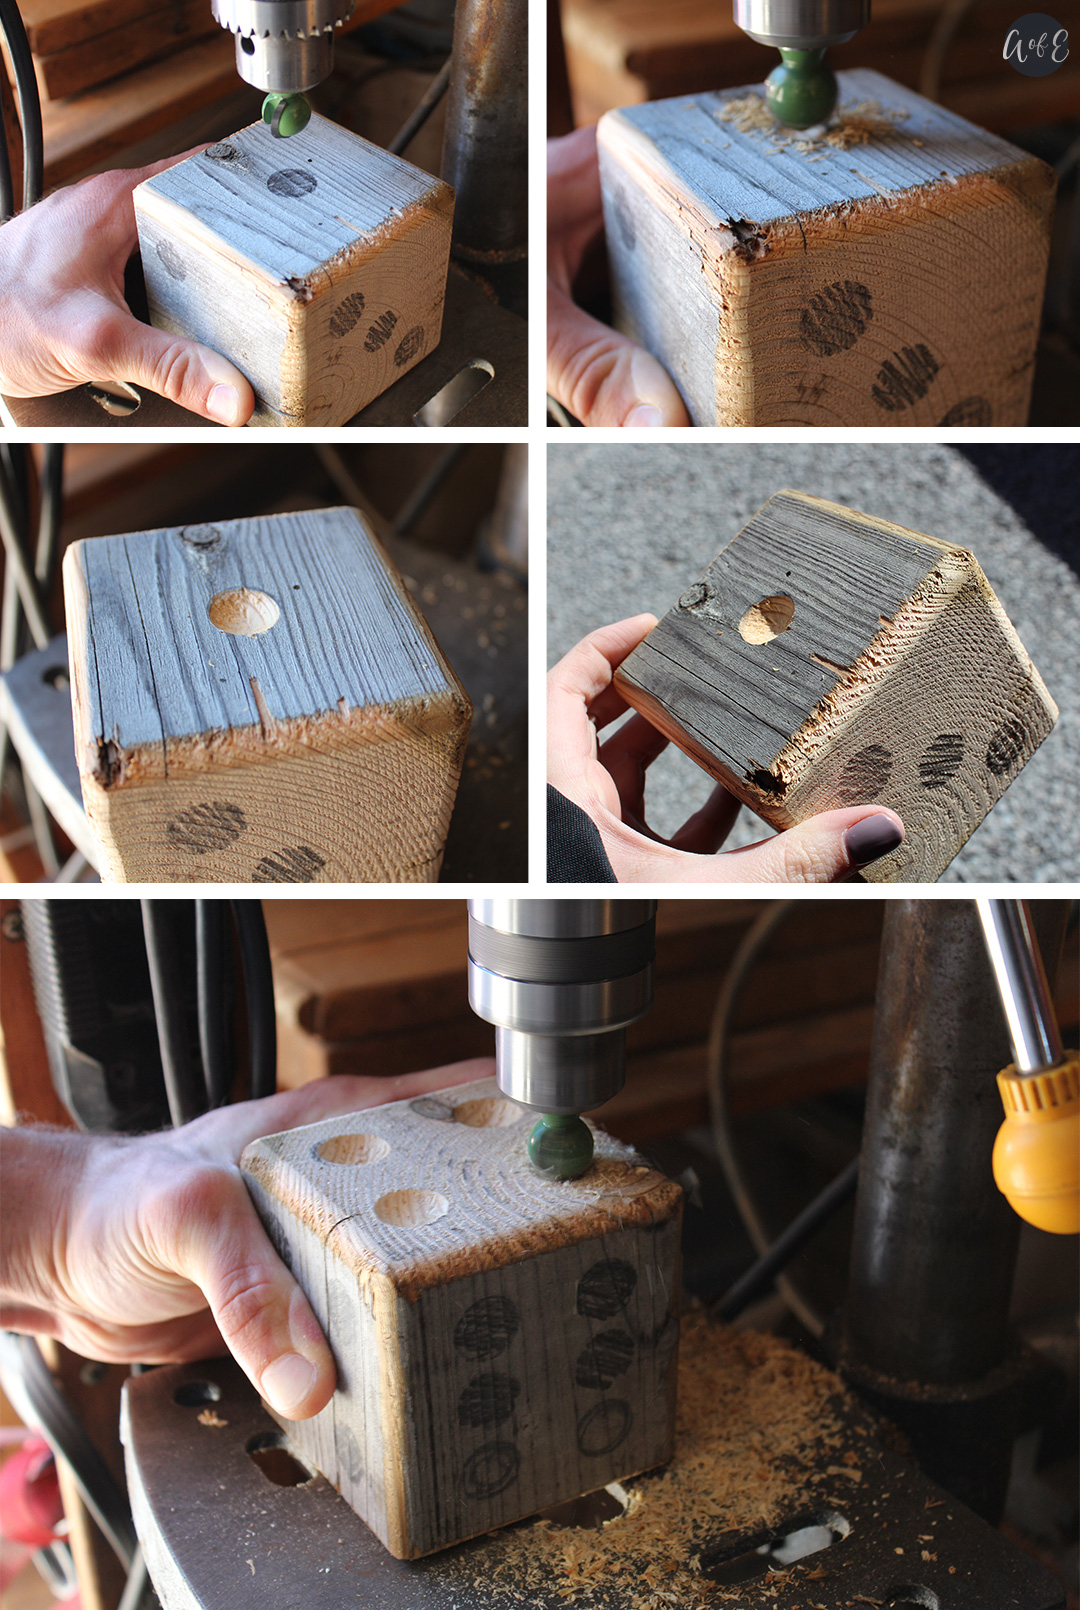
Step 4: Cove the Dice Dots
Using a ¾ cove bit and a drill press, drill the dice dots to create small indents in the wood. Don’t go too deep; just enough to see that there is an indent. Repeat this step for all the dice dots.
You do not have to use a cove bit. Anything that will slightly indent the wood will work.
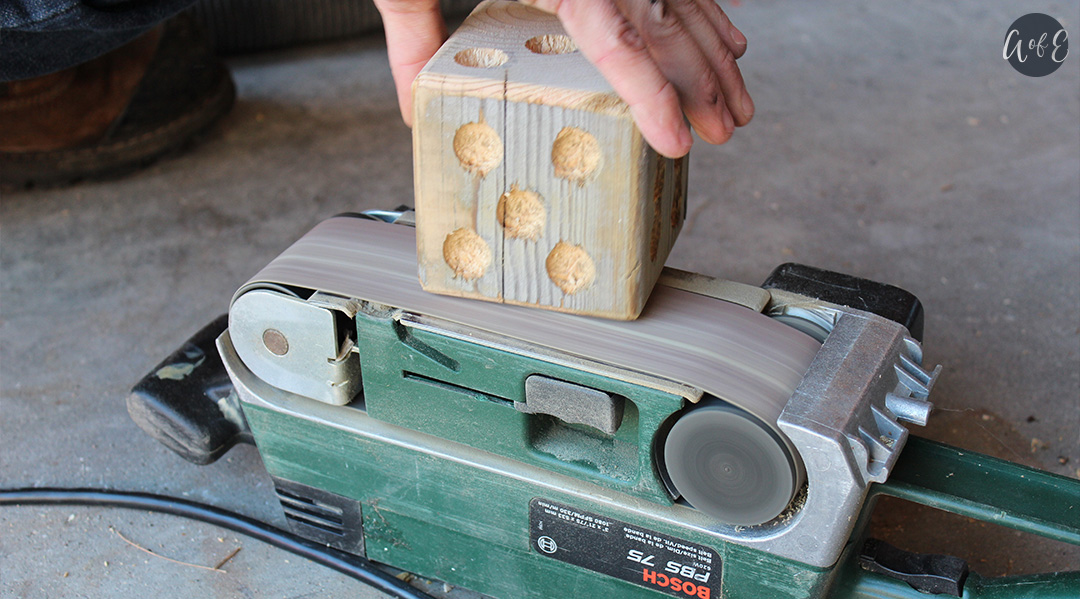
Step 5: Sand the Dice
With an electric sander, sand all faces and edges of the dice. You may want to sand the dice dots as well with normal sandpaper. The smoother, the better! You won’t want wooden slivers in your hands from throwing the dice.
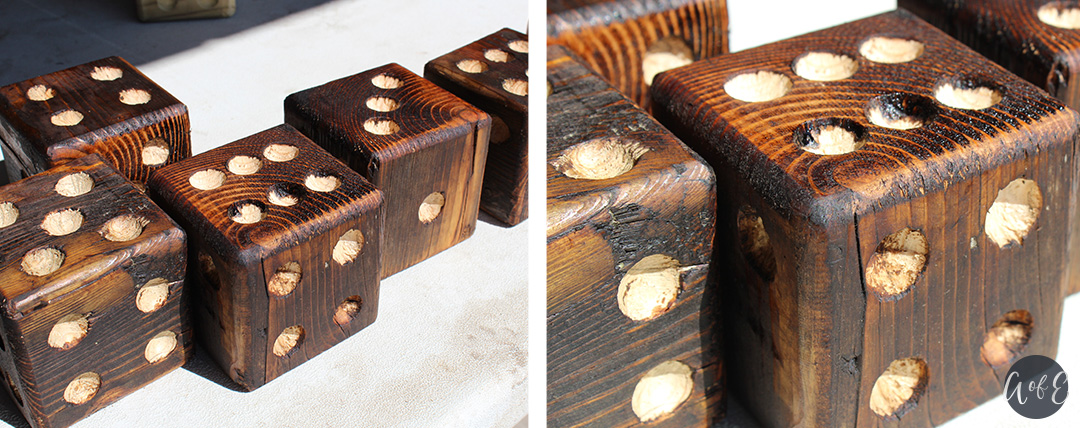
Step 6: Stain/Paint the Dice
This is the fun part! Play with colours and pick something that will stand out against the green grass. I have made other dice sets blue, black and red but for this set, I chose to stain the dice a deep brown.
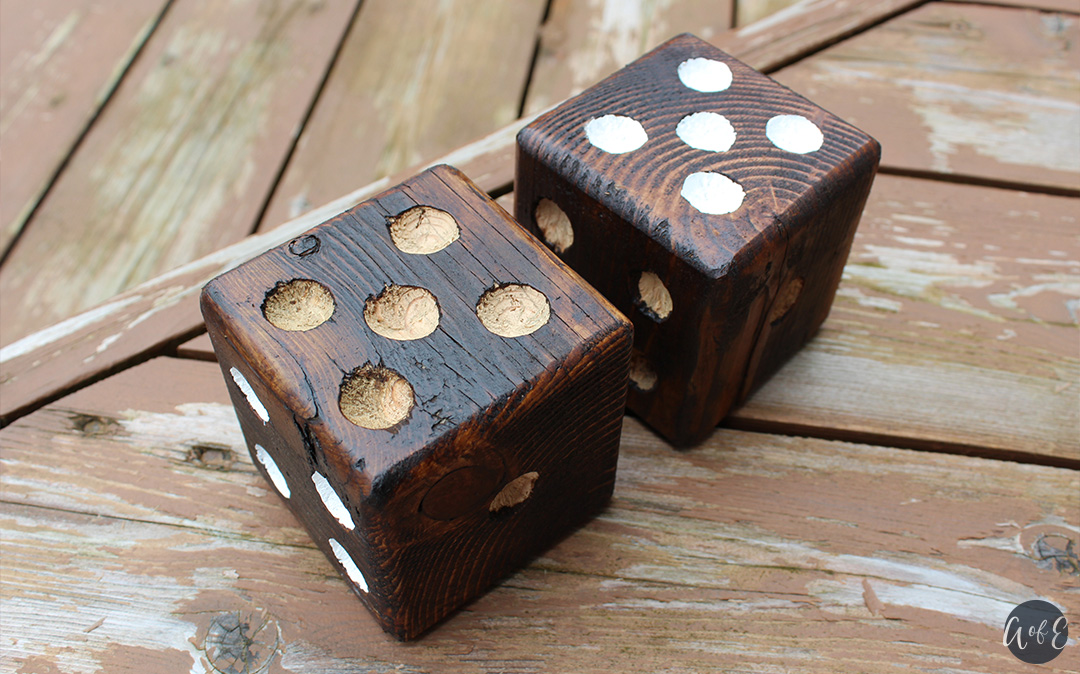
Step 7: Paint the Dice Dots
Carefully paint the dice dots. For this set I chose to paint the dots white.
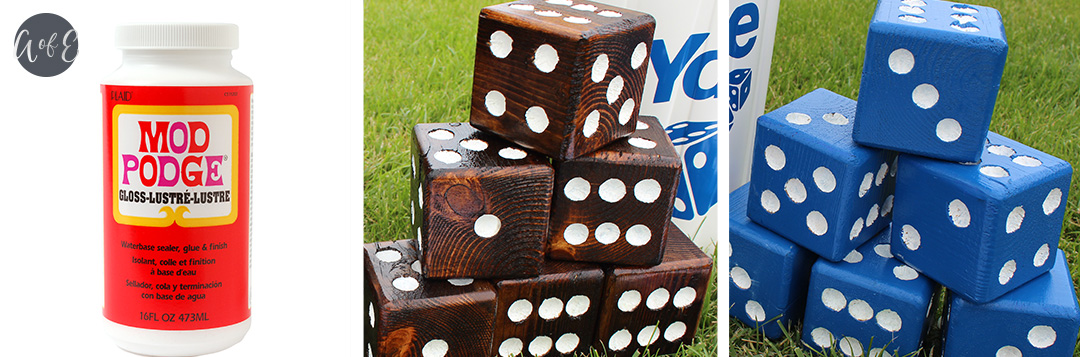
Step 8: Clear Coat the Dice
Once the paint has dried, clear coat the dice for added protection. I’ve clear coated the stained and blue dice in the picture with glossy Mod Podge. Alternatively, you can use a matte Mod Podge if you prefer a matte finish.
Step 9: Create the Score Sheets
I created my score sheets in Adobe Illustrator, but you can use any software that you are more familiar with, such as Microsoft Word. Feel free to personalize these with a family name!
If you’d like to use my score sheets instead of creating your own, click here to purchase them from my Etsy shop. If you’re looking for both the Yarkle and Yardzee PDF/JPG Score Sheet files, add them both to your cart and use Coupon Code “YARDGAMES3” to save $3 off your purchase. (You’ll also receive the logo files as an added bonus!) (** Coupon Code valid for $3 off CAD. If you are outside Canada, the coupon code will still work, but the coupon amount may change due to exchange**)
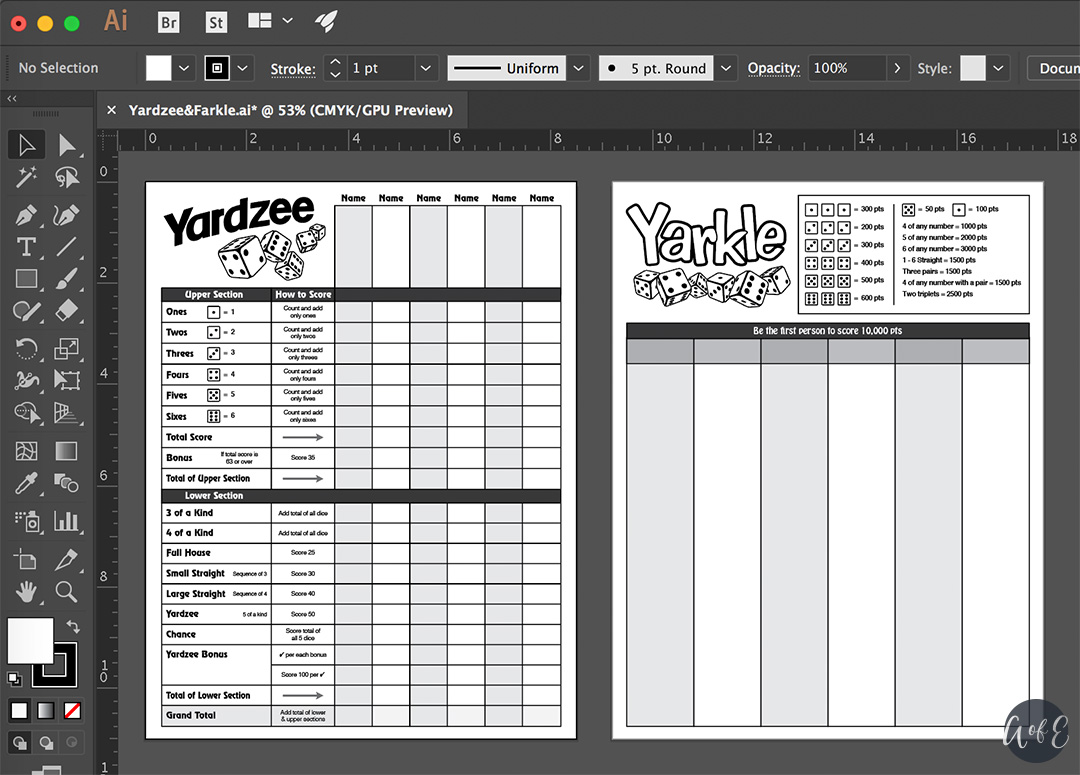
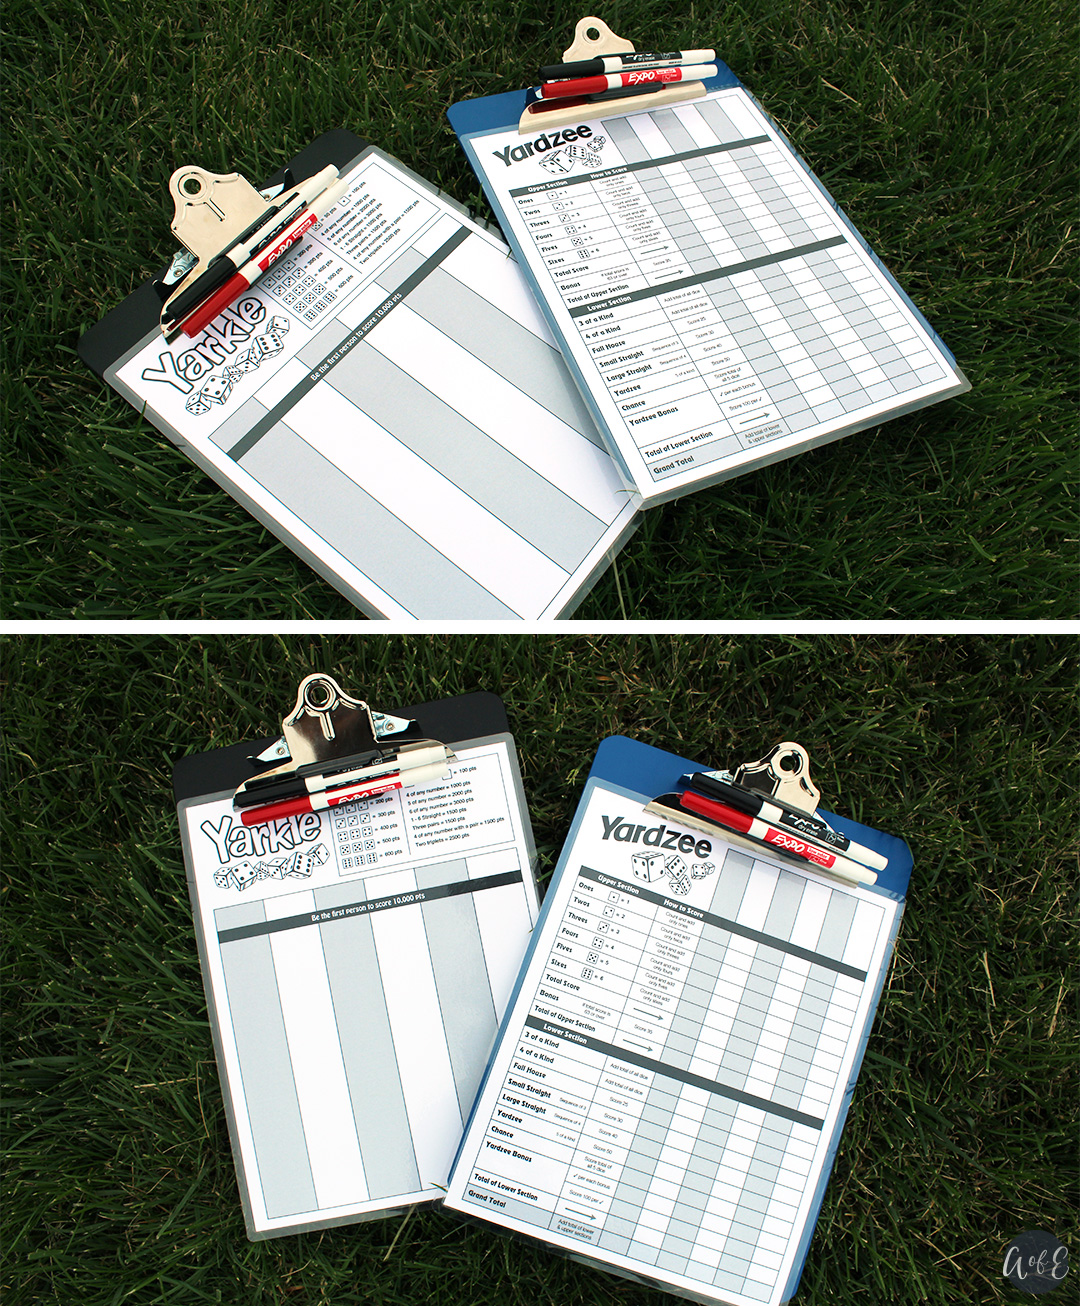
Step 10: Laminate the Score Sheets
To save trees; print your score sheets and laminate them back-to-back. The lamination turns the score sheet into a dry erase board so it is reusable for every game! One side is Yardzee and the other side is Yarkle!
Optional: Paint the clipboard to match your dice.
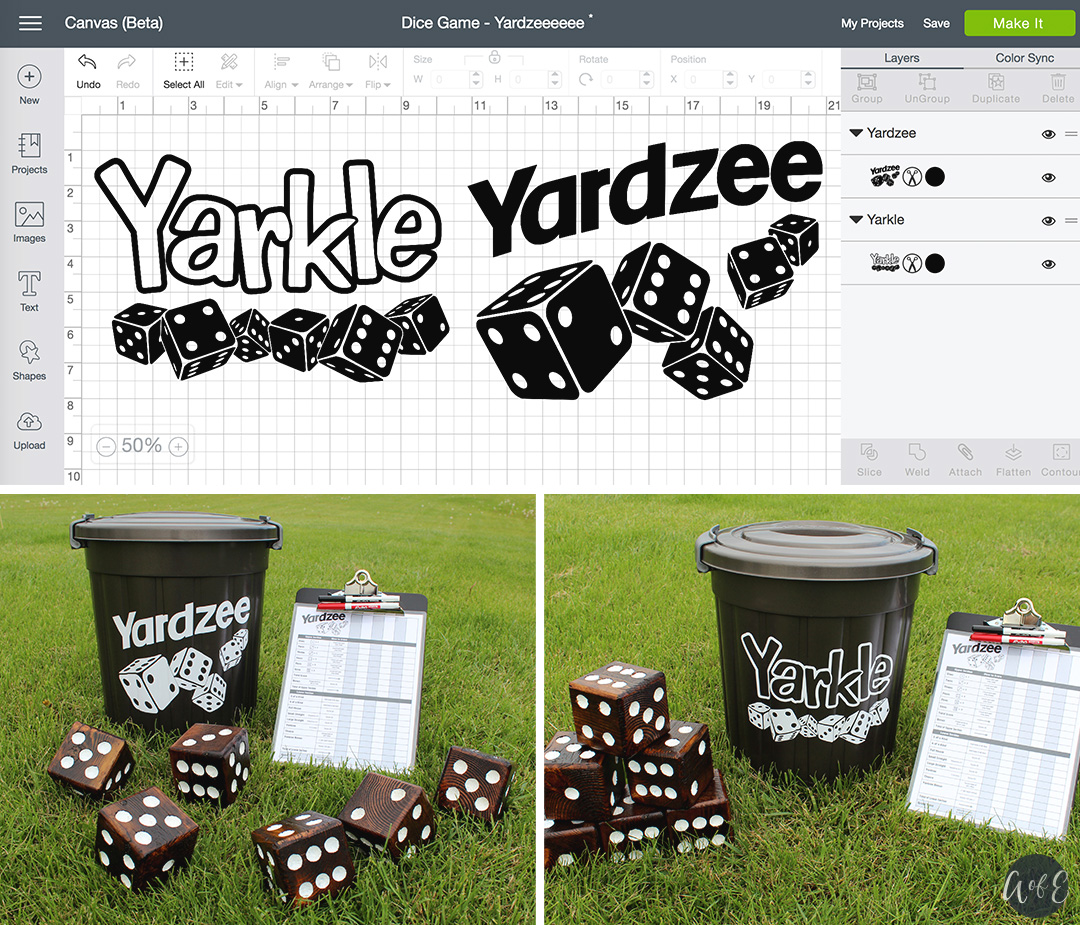
Step 11: Apply Vinyl to The Yard Game Bucket
I have a Cricut, which I am obsessed with, so I created the vinyl stickers in Adobe Illustrator and then uploaded them to Cricut Design Space to cut them. I applied the Yardzee vinyl to one side of the bucket and the Yarkle vinyl to the other side of the bucket.
If you’d like to use my Yarkle and Yardzee images for your own project, you can purchase them from my Etsy Shop. If you’re looking for both the Yarkle and Yardzee SVG, PNG or EPS files, add them both to your cart and use Coupon Code “YARDGAMES3” to save $3 off your purchase. (You’ll also receive the Score Sheet files as an added bonus!) (** Coupon Code valid for $3 off CAD. If you are outside Canada, the coupon code will still work, but the coupon amount may change due to exchange**)
If you don’t have access to a vinyl cutter and still want to do this step, you can use a water resistant label. Avery sells self-laminating ID Labels online, which would also work perfect for identifying your bucket.
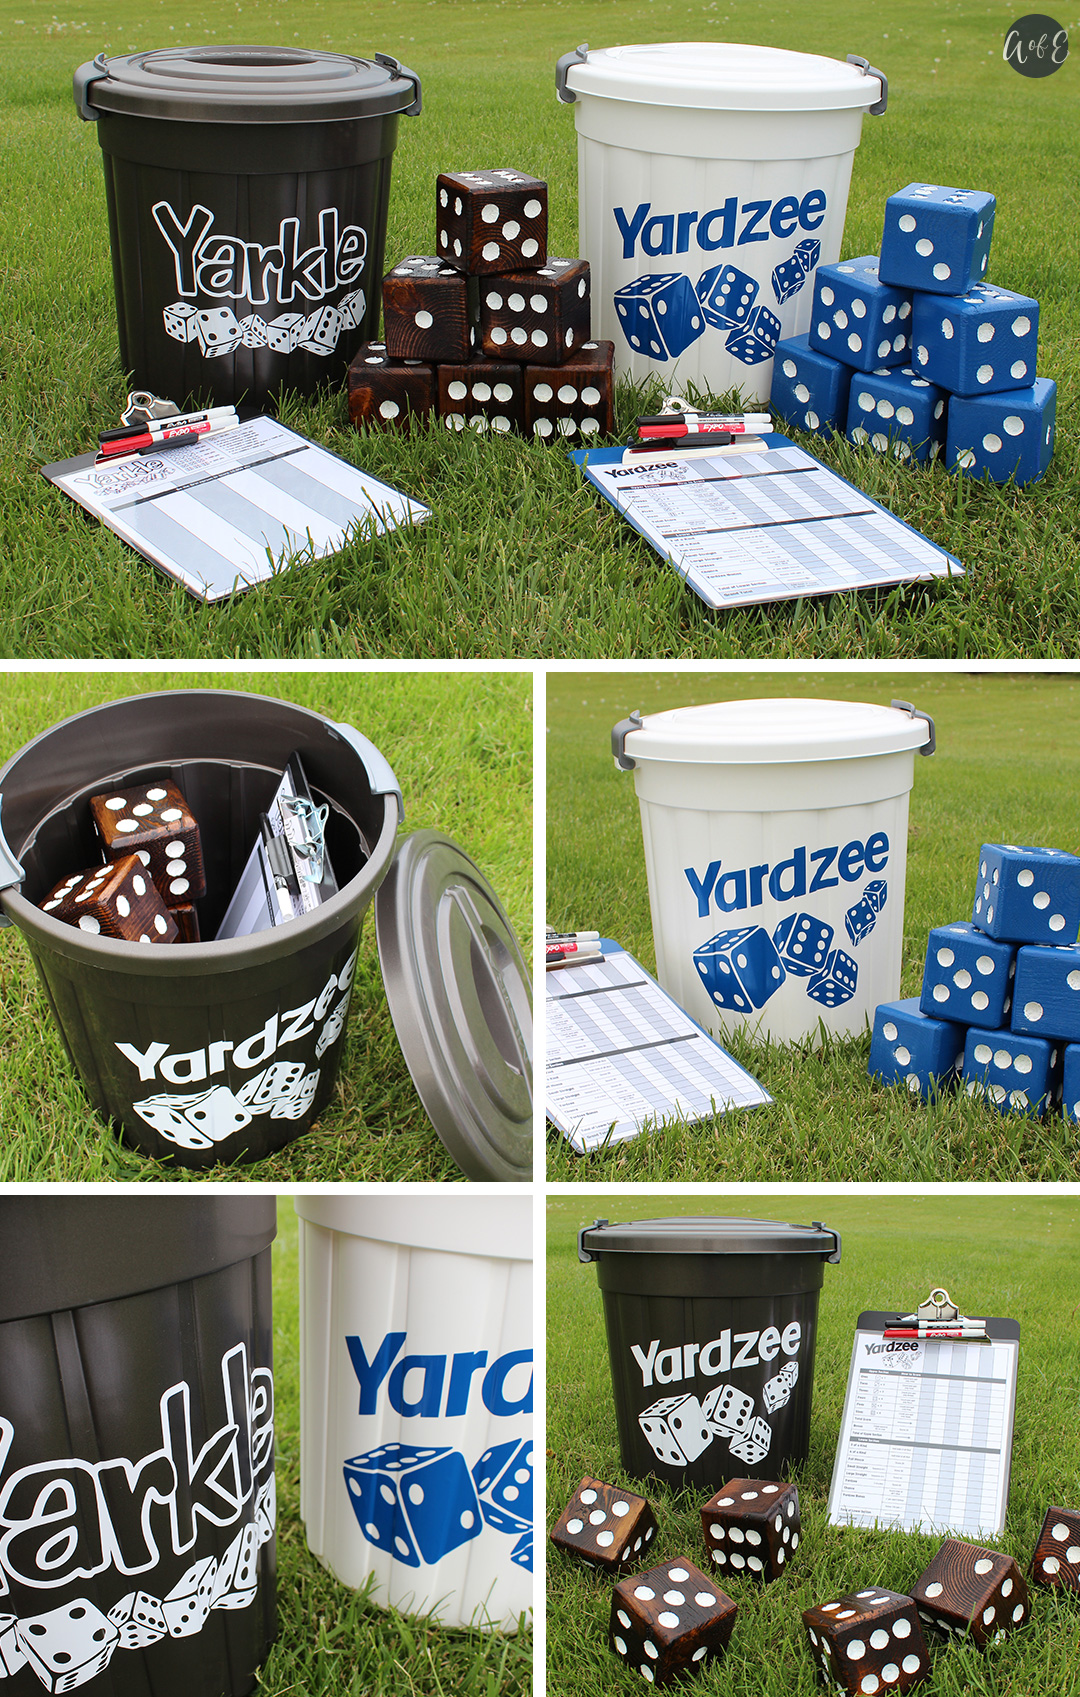
Finished Product: Yardzee and Yarkle Yard Games
Here are a few pictures of the finished yard games.
Feeling extra Canadian? Why not make a red and white dice set! Perfect for Canada Day celebrations!
Or Maybe try a Green and Black dice set!

27 Comments
This is AWESOME! Thank you Caitlin for taking the time to lay this project out for us! This is the best I have seen!
Thanks Deanna! Love the positive feedback 🙂
I absolutely love this idea and I just got a cricut!! Cant wait to learn to use it and sometime try this for my backyard!!
Thanks Kate! 🙂 A Cricut was the best investment I ever made! If you’re like me, you’ll wonder why you didn’t buy one sooner aha
Great tutorial! I am making this right now for my sister-in-law and her family for Christmas!
I hope they LOVE it!
Thank you for the tutorial. I have been wanting one and I will definitely be trying this.
Good Luck! I’m sure you’ll love the finished product!
Thank you so much for the tutorial! This is the best I have seen yet! Do you have an SVG file for your Yardzee and Yarkle decals? Or know where to purchase the SVG files for these?
Hi Lauren!
Glad you love it! It’s super fun to play too!
If you’d like to use my Yarkle and Yardzee images for your own project, you can purchase them from my Etsy Shop. If you’re looking for both the Yarkle and Yardzee SVG, PNG or EPS files, add them both to your cart and use Coupon Code “YARDGAMES3” to save $3 off your purchase. (You’ll also receive the Score Sheet files as an added bonus!)
https://www.etsy.com/ca/shop/AbundanceEverything
Hope this helps!
Cait 🙂
Thank You – this is a GREAT tutorial and I appreciate you sharing the scoring sheets you’ve created! Would you be willing to share your vinyl cutting file? Or even the Adobe Illustrator file (I have cricut design space as well)? I’d love to have the vinyl match the scoring sheets :). My email is spmarianne.coupons@gmail.com if this is a possibility.
Hi Marianne!
Thank you soo much! I love to hear feedback 🙂
If you’d like to use my Yarkle and Yardzee images for your own project, you can purchase them from my Etsy Shop. If you’re looking for both the Yarkle and Yardzee SVG, PNG or EPS files, add them both to your cart and use Coupon Code “YARDGAMES3” to save $3 off your purchase. (You’ll also receive the Score Sheet files as an added bonus!)
https://www.etsy.com/ca/shop/AbundanceEverything
Cheers,
Cait 🙂
I love this and am going to attempt it for a Farkle obsessed friend Are you willing to share what font you used for Yarkle?
Hi Kristin! Glad you love it!
I actually drew the Yarkle font in illustrator – It is not a font. I do have the SVG/EPS/PNG available for purchase on my Etsy Shop if you are interested in using this exact one. https://www.etsy.com/ca/listing/622959655/yarkle-farkle-digital-cut-file-pdf-score?ref=related-1
Hope this Helps! 🙂
Cait
I thought yardzee only used 5 dice
Yes Yardzee only uses 5 dice – but Farkle or “Yarkle” in this case uses 6 dice! If you want to only make a yardzee, you’ll only need to make 5 dice instead of 6! 🙂
I am LOVING this and want to make my own as well! I have a few questions for you… Does the Lee Valley website actually have the 3/4″ cove bit, or am I just missing it? Or can you recommend another good brand/site? Lastly, I have a vinyl machine, but I’m still learning the program. Would you be willing to sell the score cards for me to print, and the decals for the bucket as a PDF or SVG for me to cut on my machine?
I just realized you already included a link for the score sheets..thank you for that, you are awesome! So I guess I’m really just interested in the vinyl decals 🙂
Hi Melissssssa!
Awe thank you so much! Glad you love it!
I did purchase the 3/4″ Cove bit from Lee Valley. I must say that there website is not the best quality… I actually purchased this bit in store. I’m sure you could also purchase it from any Home Depot or Canadian Tire in your area. I specifically chose to use a cove bit to get the smooth rounded dice holes but you could use any bit really! If you can’t find a cove bit, try a different Router bit – they might actually be cheaper than a cove bit.
You can Definitely purchase these SVG Files! They are available for purchase in my Etsy Shop. If you’re looking for both the Yarkle and Yardzee SVG, PNG or EPS files, add them both to your cart and use Coupon Code “YARDGAMES3” to save $3 off your purchase. (You’ll also receive the Score Sheet files as an added bonus!)
https://www.etsy.com/ca/shop/AbundanceEverything
Hope your project turns out GREAT!
Cait 🙂
Sorry for my Absence Lately and delayed responses – I have been having some Technical Difficulties, But everything has been fixed now! 🙂
Wondering where you find the buckets? I have looked everywhere and can’t find plain ones
Hi Tina!
I purchased these buckets at Walmart. https://www.walmart.ca/en/ip/mistral-24l-multi-purpose-can-white/6000016943718
Hope this helps.
Caitlin
Cute project. I think I will use it. I will say that the Cove bit you mention will not work. Cove bits are edge cutting bits and have bearings on the ends of them that would prevent you from making that indentation and will damage that very expensive bit. The bit pictured in your instructions is not a Cove bit, but a Plunge Ball Bit and would be perfect for making those indentations. It is also considerably cheaper.
Awesome! Thanks Michael. Good to know! My Lee Valley refers to this bit as a cove bit but I can agree that it is a bit messy and does require sanding the holes.
I love that you have found an alternative option. Thanks for sharing!
– Cait
Hi there – the discount code doesn’t seem to work anymore? Is there a new code?
Hi Mike!
The coupon code “YARDGAMES3” does still work. You will need to purchase both the Yardzee and Yarkle files in my etsy shop in order to be able to use this coupon code.
[…] YARDZEE AND YARKLE YARD GAMES From Abundance of Everything […]